Long ad

Come and See!

Translate

Monday, October 6, 2014

Sun-Catching Autumn Wreath (EASY Kids craft!)


So this craft just made me smile from the minute it was hung up!
With all of the beautiful fall leaf colors and the coloring of my little one showing through the leaves when the sun hits it :) Just awesome. Not to mention, Linkyn also loooved putting it all together with mom!


What you need:
  1. 4 wooden dowels (any size and thickness)--I used 2 skinnier and two thicker from a mixed bag of dowels, similar to these here: wooden dowels sale $1.49 joann
  2. Mulberry Paper (Acid & lignin free paper)--Its a transparent hand-made kind of paper. or tissue paper if you have some around or didn't want to spend more.  This is the exact one I have, although currently out of stock: http://www.amazon.com/MULBERRY-BRIGHT-STACK-MAKERS-SCRAPBOOKERS/dp/B00384MRL0/ref=pd_sxp_f_p BUT this is the same type paper here: google search: Mulberry paper   just find the colors you want. Or check your local craft stores, such a s JOANN Fabrics and MICHAELS.
  3. Hot glue gun--gluing your four dowels in a square shape, as well as putting on the drawn, cut, and colored on leaves.
  4. Elmers glue--putting on the mulberry paper
  5. Ribbon to hot glue onto finished wreath for hanging (optional)
  6. scrap book paper (fall color) with white back (if you want to be able to see the coloring your child makes more clearly.
Directions:

  • Draw some outlines of leaf shape (about 6-12 all diff sizes) on any color scrapbook paper.
  • Hot glue your dowels into a square shape while your little one colors the leaves you have drawn or printed (can print these here if you'd like: http://kilopats.net/leaf-pattern-cut-outs/ ) This is the one I used, but just drew my own to cut.
  • have your child rip up the mulberry paper (or cut if old enough) into diff size squares while you cut out the leaves.
  • place glue on diff spots of the dowel frame and have your child wrap the paper around the spot "pinching" it into place (can get sticky!)  try and alternate where the colors go to get a nice even look at the end ;)
  • then hot glue on the scrapbook paper leaves on top of the colored paper already glued.
Now,...Go hang it up in a window or glass door!


Pin It!

Ways to make General Conference Even MORE Productive!


If any of you are like me, it can be hard sometimes to sit for so long. Don't get me wrong! I look forward to hearing the messages and do enjoy the longevity of the spiritual weekend. It is so nice to hear the counsel that we all so need to be reminded of. On the other hand, it can be tough to literally be sitting for so many hours.

So I have compiled a list of things that I have done (or will do in conferences to come) that can help that idleness feeling! Here are some productive things to be doing along with listening to the speakers!

  1. Write in your Journal -- this one is probably a 'no-briainer' to most, but I recently realized that as long as I am sure to write in my journal during conference (every 6 mos--April and October) [because its hard to do often when you have kids or are busy with work or whatever else life brings!] I will be able to 'get it done' and capture what I need to remember or ponder during a very spiritual time :) Jot down a favorite scripture, quotes, stories, impressions. Reflecting on Blessings, Revelations, Promptings, goals and accomplishments would be great things to write down.
  2. Write in a child's journal and/or baby book-- obviously this only applies to those who have kids, or who even keep a journal or baby book for them. I like to write things down in more detail about each of my kids (in one journal) as they are growing and learning new things. Not only for me to remember, but for them to have as memories in their future. I also have baby books for each kid to record all their milestones, certain pictures, etc. so this could be a great time to fill these facts in!
  3. Scrapbook or Photo album-- finish up a book or start working on storing those memories in one.
  4. Massages--Can give one another (or just spouses if kids are too small) massages during one speakers time at the pulpit. Take turns!       *Younger Kids can give dad (or mom) a 'choo-choo' massage to make it more fun and entertaining for the kids, as well as quiet for the adult! Click below to see the 'Choo-Choo!' shirt I made for the kids to give their dad on fathers day last year.               Click here: (I love you) Choo-Choo Massage T-shirt
  5. Put Visiting Teaching Treats and message together---Assemble treats in bags,etc. and cut out and tie on messages.
  6. Future FHE topic planning--Make note of anything YOUR particular family could work on improving. Later you can brainstorm ways to go about teaching those topics at a FHE. *If you have older kids, make sure they jot some ideas down, and after conference is all through, compile a group list of the topics. Have each child prepare FHE's based on those topics (assign) until the list runs out ;)
  7. Mend clothing---I usually have a small pile of things that I set aside UNTIL I am totally ready to sit down and do it all at once! So this conference I fixed some bib clasps, my coats button that fell off, etc. Great use of my time.
  8. Fold clothing--anything clothes not yet folded...? Do it now :)
  9. Craft--If you are watching Aprils General Conference put together an Easter, Mothers/Fathers day, or 4th of July craft.   If you are watching Octobers General Conference put together a Halloween, Thanksgiving, or Christmas craft.   
  10. Write--or email  a missionary or family or friend.
  11. Thank you notes---or kind complimentary/invitational notes to Family, friend, neighbor, acquaintances (church, school, work...)
  12. Paints your toes!--or fingers :) If you have lots of girls in the home, you could paint each others.
  13. Make a family treat during the breaks-- in between sessions, or right before the the second session of the day begins to enjoy during the speakers.

                                                                                         .

*(Optional) PRE-Conference planning!
[ideas for young and older children]

Younger children:
These are some of my favorite links to keeping my kids busy during conference!

Adult and adult children:

  1. M&M
Make the Most
of General Conference

Loved this idea!
for your free printable!
Great idea for visiting teaching
But also great to do as a family before conference begins!


2.    Treat Conference weekend like any other big holiday...
  • Make a big Special breakfast Saturday am (starting off the weekend)
During or right after breakfast discuss as a family things to look for in helping improve your current family situation or any family goals, and things that could be of help to achieve those things. (refer to the m&m printable above)
  • Make a family treat in between both Saturday and Sundays sessions (or sleep, or play games!)

  • Make a big Special dinner Sunday night (to end the conference weekend)
At the family dinner (or during dessert following) discuss the feelings and opinions, as well as jot down the findings of the things to be looked for during the sessions. Make a family plan as to how to achieve your family's goals.

Hope you were able to find some ideas that you can now use to make your general conferences more productive...
                             Let me know what you think! 

Do you?... have any ideas that could be added to this list? 
What fun general Conference traditions do you do with your family??


Pin It!

Choo-Choo Massage T-shirt for Dad


This Choo-Choo Massage Shirt was really quite easy. 
Took a bit of time and some creativity, but only need a few items!

Items needed:
  1. Puffy paints
  2. t-shirt in desired color (and dads size)
  3. train (or cars if you'd rather make a race track!)
Have some fun!


Now, how easy is this!?


Pin It!

Thursday, October 2, 2014

OH Deer! Easy Costume Idea


 So,...are you anything like me and always wanted to be a deer for Halloween!?...Okay, me neither, haha, but my sister came across the idea last year, and I gave it a try...

I mean, look how cute this lil one is, right!? AND it was pretty darn easy altogether!


What I used:
  • white eyeliner for nose/middle of brows and cheek spots
  • brown eyeliner for lines under eyes and and fully lining eyes like wehn regularly using eyeliner
  • peachy pink colored eyeshadow to blend top of nose (white) with my forehead
  • black shimmery eyeshadow to daarken eye lids
  • black liquid eyeliner (although regular would work too) to line my nose and fill in and darken eye brows
  • tan shimmery eye shadow to tan/brown my nose (around black lines)
  • bronzer and blush under (before) applying spots!
  • oh and a little pinkish colored lip liner to fill in my lip color a bit!!
LAST, some leaves or sticks or both to act as ears and antlers :)


Pin It!

Spidey Hair Accessory [up cycled]

Great for a last minute Halloween touch! 
Add to your work day attire...yours or your little girls costume, or any Halloween event!  

What you'll need:
  1. Spider ring (any color)
  2. bobby pin, barrette, hair clip... (I got mine at Joann's I believe in like a pack of 6 for around $1.00)
  3. dryer sheet (used or unused)--unused will be easier to cut and smell stronger, but used will be softer ;)
  4. jewel
  5. hot glue
  6. tiny piece of string
Directions:
  • pinch a dryer sheet down the middle to decide the size of hair bow you want
  • trim edges to desired size
  • snip small triangle shapes off of the ends to give it some texture/ spider 'web' looking touch!
  • pinch the dryer sheet down the center again and fasten the middle by tying your ting piece of string onto the center.
  • hot glue the dryer sheet 'web' to the bobby pin
  • snip the ring part of the spider completely off
  • hot glue on your spider over the trimmed string in the center (at the angle you want--mines a little to one side)
  • hot glue on your jewel, and you are done!


Pin It!

Popsicle stick Spooky Fence


Supplies needed:

  • Brown or black acrylic paint
  • any halloween color paint to write 'Eek' and other details
  • Googly eyes (all or any size)
  • hot glue gun
  • twine or any ribbon/string to hang
  • glitter glue (optional) --to put over writing and details
Directions:

...you decide the design of your fences!
  1. paint your Popsicle sticks, let dry...
  2. hot glue your sticks (7 sticks) to two back post popcicle pieces, spaced as you wish
  3. paint on your letters...and and details (I did stars and a moon), let dry...
  4. IF DOING GOOGLY EYES, hot glue them (place hot glue fully around the front of the eye) to the back of your fence/s (the glue can be messy on this part but it doesn't have to be perfect to turn out well)
  5. then hot glue top back post of each fence to the string that you chose!


Pin It!

Thursday, January 16, 2014

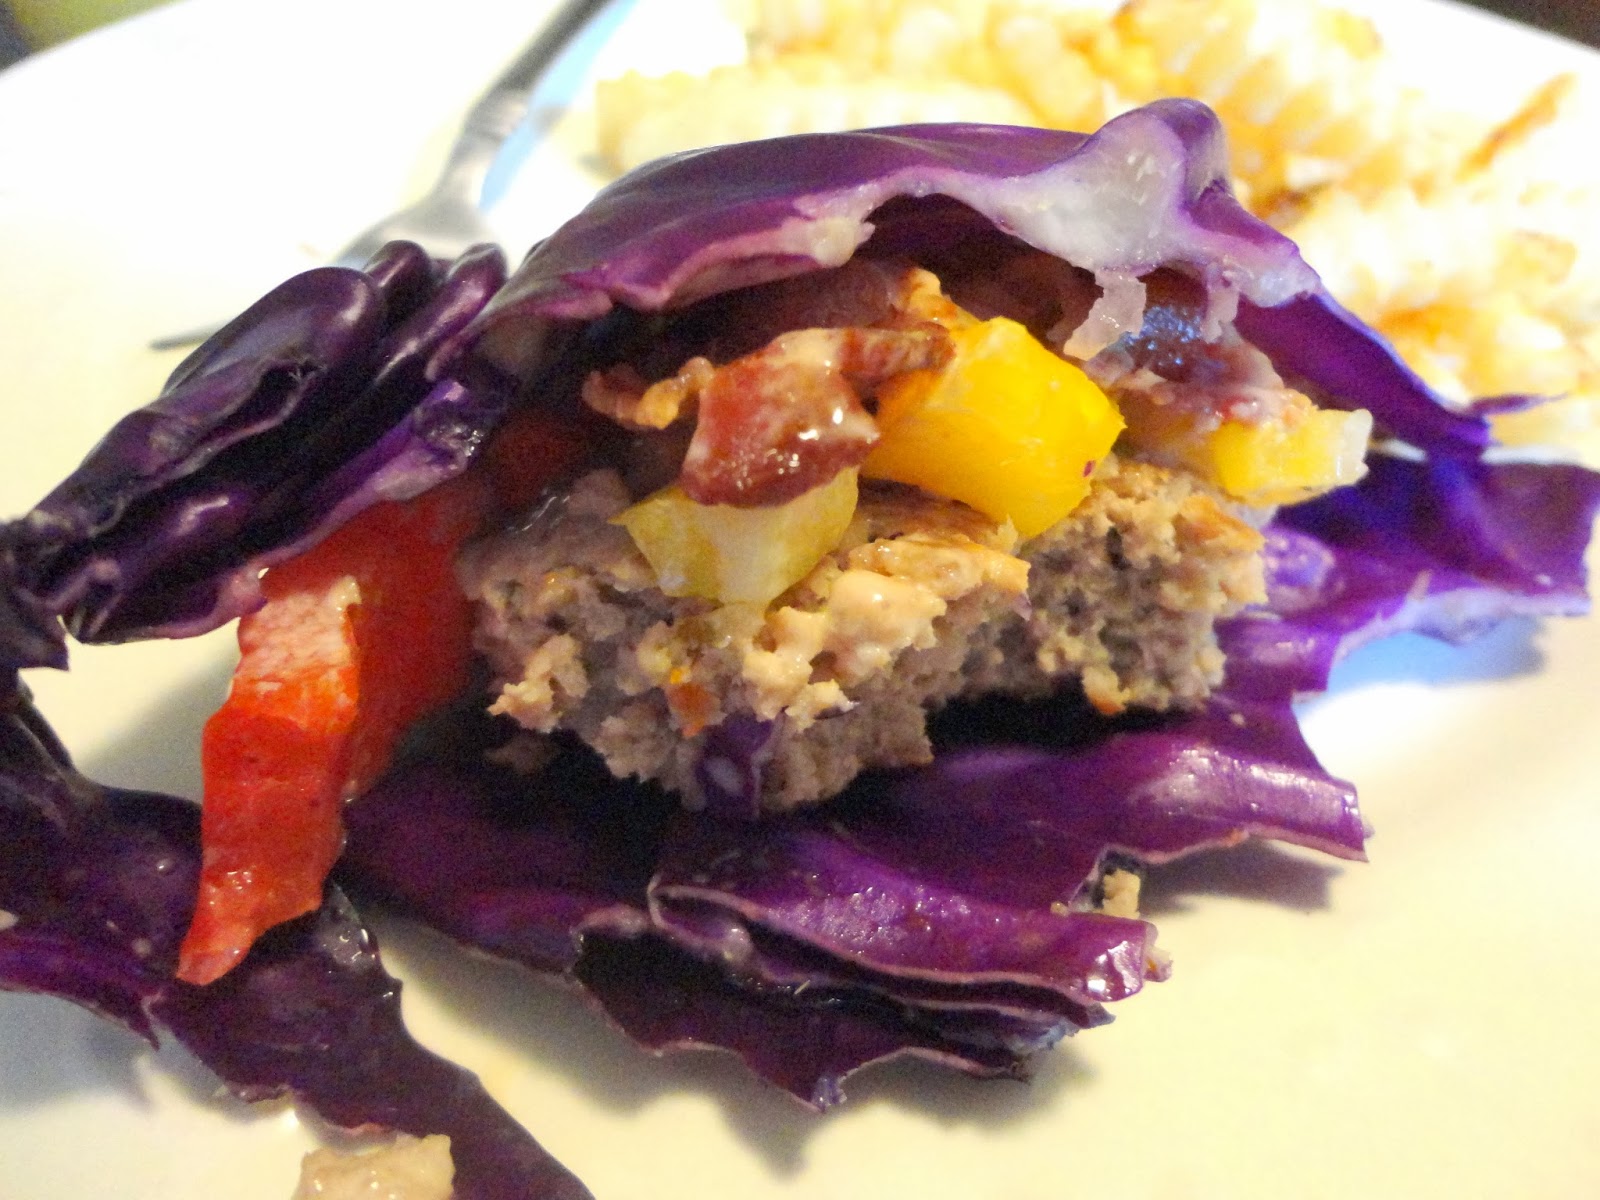
Protein style--TURKEY Burger


This is one crunchy, healthy and satisfying burger...if I do say so myself!


Ingredients:
  • Purple or green cabbage
  • red and yellow (or color of your liking) bell pepper
  • bacon
  • minced or dried onion flakes
  • KEN's Steak house Thousand Island Dressing!
  • 1 lb ground turkey
Steps:
  1. stir thawed meat and shake in desired amount of onion, OR after forming your patties--shake desired amount on the top (after pressing down with a spatula)
  2. scoop 4-5 medium size balls of meat, flatten a little in your pan and cook them until desired browning.
  3. as the patties are cooking, have your bacon cooking in a separate pan
  4. cut up desired amounts and lengths of bell pepper
  5. cut off the base of your cabbage (after washing) and peel back the number of halves you will need to make your burgers
  6. layer your ingredients on the patty when all is cooked and cut, and drizzle on your thousand island dressing!
Enjoy :)

MmmmMMmmmmMmmmm!


Pin It!
Related Posts Plugin for WordPress, Blogger...

ad 1